for kids, by kids (but anyone can)
![98]()
Artful hair.
Kids are so creative and express it in caboodles; even with hair. My creative niece, Emma, shared so much creativity this summer and I keep thinking that we’re so glad that
“what happened at Emma’s Summer Camp, didn’t stay at Summer Camp” — Emma returned from summer camp exploding with hair skills that she gladly shared.
Just click below for the full photo tutorial.
(Best of all, this hair has only 5 steps and is genuinely done by kids for kids (but, you can, too)
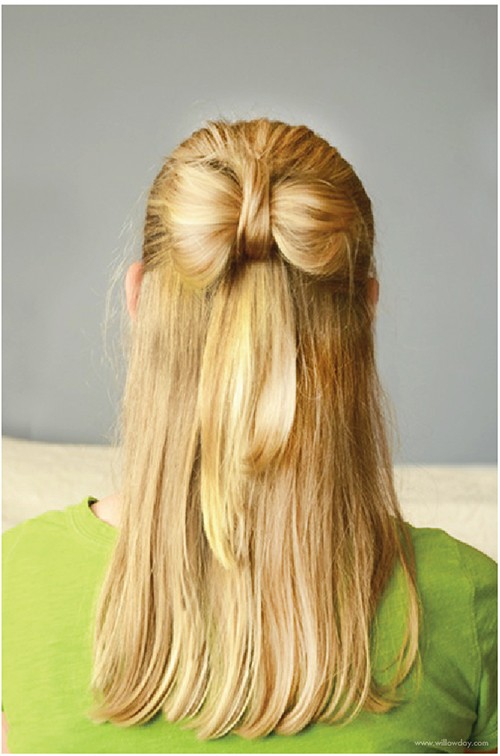
I feel extra lucky to share Emma, along with our daughter and one of the many hair-do they sported all summer long. I’d love this for a party. Clicking these photos felt like a small victory because so much of their time is spent together in the water! (like this)
![97]()
With a summer of lots of wet and wild in the water, I wish I had thought to snap actual “hair” pictures earlier but, am so pleased to capture and share this!
Let’s get started.
Make Bow Tie Hair in just 5 simple
How to Make Bow Tie Hair:
materials: Brush, comb, hair pins, hair band
Start with well brushed hair.
– Pull hair smoothly against scalp and we’re ready to get started with 5 steps to bow tie hair.
Step One:
Keeping hair smooth against head, pull hair into pony tail but do not pull the ends completely through — make a little pouf with hair. This pouf will become the bow so positioning the pouf correctly is important.
Step Two:
– Next, press pouf flat and split in half.
Above: Step One: creating the smooth + secured hair poof.
Above: Step Two: flattened pouf
Step Three: Continue by using hair pins to secure both sides of the “bow” in place. Use the hair pins along the sides to discretely hold this pouf against the head. (Below you can see the left side of the pouf, split and pressed into the bow shape and the left side being secured with pins.)
Step 4:
Once the bow is secure, take the long tail or remaining piece of hair in your hand. Twist this piece of hair.
![93]()
Step 4: Twist the loose tail.
Step 5:
Now, take this tail or piece of hair and draw it around the center of the bow; pulling it up and over the top, then, under the center back down. Secure with pins.
![92]()
![91]()
Step 5: Pull the twisted tail back up and over the middle. Secure.
When I was Emma’s age, my hands were never still. I shared her cousin role, as “hairdresser to the cousins.” When I see her working on hair now, it’s so much fun to think back to the days and doing the hair of cousins, siblings and … neighbour boys hair. (Yes, I said boys and, that’s right: pink ribbons and all — my neighbourhood was ALL boys, which meant spending a lot of time running, jumping in puddles and doing bike stunts speckled with interludes where we would slow up and they would humour me by letting me do their hair while being well bribed with a popsicle. (Oh, if I could find those photos!…)
Where you like me? Did you like to do hair as a kid, too? Do you like doing your children’s hair? I love making Francesca’s tight ballet buns, gymnastics pony tails, as well as fancy party hair but, hmmm, me? Do you enjoy doing your own hair now? I have to confess that I’m happiest to really not think much about it — long + simple and often twisted up in one of 3 ways — and; I confess…sometimes I wish I could just roll out of bed and just go — (and, yes… this has happened …)
That being said, I’m glad to have had the experience from childhood and now, learning from my daughter and niece.
Just 5 steps to tie hair up in a Bow Tie. This feels like the perfect transition back from beach to civilisation!