
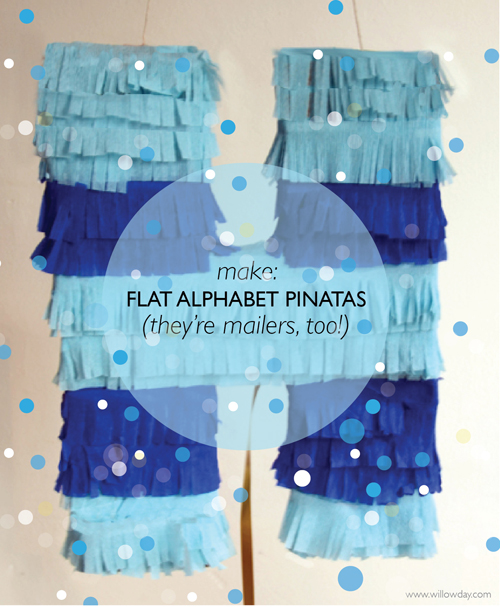
(Would you believe that this piñata slips right into an envelope? YES, they’re mailable, keepers and adorable, don’t you agree?)

I’m weak for piñatas. Are you, too? They’re a regular part of our family birthday fare. I was pondering a birthday present for a nephew, with nothing jumping out from our regular gift idea list. I happened to be in the middle of creating a giant piñata for our daughter,Francesca’s, birthday party (past birthdays are: here + here) and was suddenly struck by an idea: “couldn’t one create an easy mailable piñata?” Piñatas are so interactive and festive — if we can’t fly over, why not make initial, letter sized, piñatas for each niece and nephew in the year to come and immediately started in on an “H” for Harvey! (Hip Hip Hurray) Not only can I imagine the fun he’ll have opening it up: but, potentially, think he could have it in his room, for decoration, too? (After breaking, these piñatas maintaining their shape!)

Materials You’ll Need (continue by clicking on “read more” below)
Cardboard (one-ply works best) cut in to the letter you’d like (x 2)
Scissors
X-acto knife
Pencil
Crepe paper (I chose blue and turquoise)
Baking Paper or Tracing Paper (You will trace and duplicate the cardboard letter. You will need 2 in order to create a pocket.)
Craft Paper Tape or Craft Packing Tape
Cord for hanging
Ribbon/Cord for pulling
Treats for the inside: (I chose gold coins, Swedish candy and money which I wrapped)
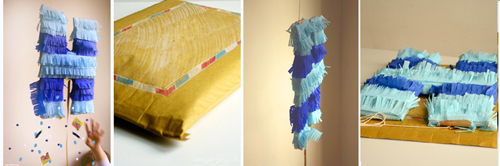
Mailing Envelope

Step 1: Cut out 2 identical Cardboard letters. (If you don’t want to free-hand a letter, print out a large letter onto plain paper and use this as a template.)Step 2. Set the cardboard letter onto the baking paper/tracing paper and cut out the letter. Note: Since H’s can be folded in half and fit together, I didn’t have to cut two. This “tracing paper” letter will be used to form a pocket and you might need to, instead, cut, two baking paper letters, instead. (Just like an H, the letter O and I will work to fold in 1/2 but, most others will not; so cut, two.)
Step 3. Set the tracing paper letter on top of the cardboard letter and form pocket by folding it up or if you’ve cut double letter, cut it off at the appropriate end point. For the letter H, I stopped the pocket at the top of the H’s legs.
Step 4.Tape the edges of the pocket closed, leaving the bottom of the pocket open. Cut one very long piece of cord. This cord will fall from the bottom of the piñata and will be the cord that will pull the piñata open.


Step 5. Fill the pocket with presents.
Step 6. Once the pocket has been filled, find the center of the pulling cord and lay it inside, along the bottom, of the pocket.
Step 7. Carefully tape the bottom pocket closed, leaving the pull cord string falling out of the sides. Once the bottom has been taped, bring these pulling cord strings together and tie them in a neat tie as close to the pocket as possible. You make use these double cords and your final pull cord OR clip them close to the knot and tie a more ornamental ribbon over the top, as I have done and that you can see in the photo.
Tape the filled and sealed pocket in place, on top of one of the cardboard letters.


Step 8. Cut the hanging cord. Press a hole along the top of the letter into which you will thread the cord. I chose to hang cord from both sides of the “H” and poked a hole on the top of each side. Thread the hanging cord into this hole. Tie and now, tape this cord firmly to the cardboard letter to hold it into place.
Place the second cardboard letter on top of the first letter which now has the pocket attached to it as well.
Along the outside edge only, tape and seal all of the edges. 1. Leave a place for the hanging cord to come out of the top of the letter and 2. leave the center (bottom) of the letter untaped because this will need to release the candy later and will be covered with tissue paper only – no reinforcement necessary with tape for this area. It needs to break fairly easily
Step 10. Starting at the bottom, begin gluing the crepe paper to the letter. You will begin at the bottom and work up: glue, then press the layer or crepe paper completely around the form; repeat: glue and repeat by slightly overlapping the first row of crepe paper with the next layer, working all of the way up the letter to the top in this fashion.At the top of the letter, cover this area with glue, then, fold one uncut piece of crepe paper over the top edge and glue into place.
Continue covering the piñata in this way until it is completely covered. Olé and Happy Day! — once covered, the piñata is complete! Use it. Give it. Decorate with it or surprise someone else!

I hope you have someone you, too, could mail a piñatas surprise to! Tailor make the colors and contents for someone special and pop this party in to the mail box.
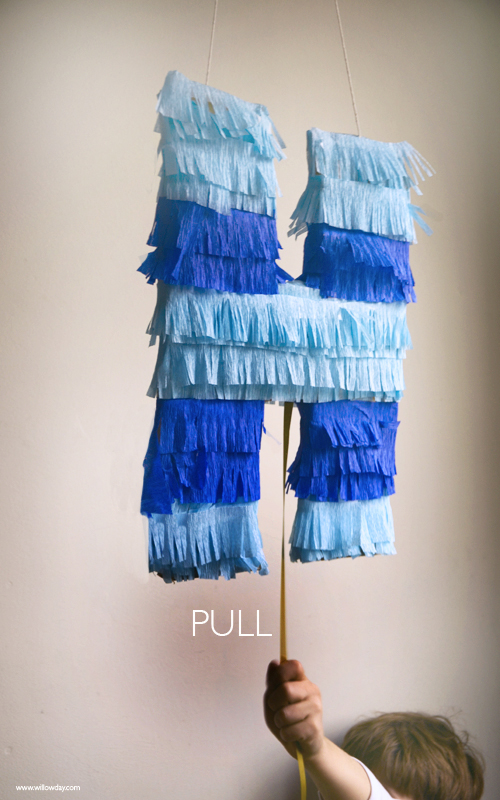
Optional: I added a name tag to the top hanging cord and to the bottom pull cord, lettered the words “pull me” to both instruction and whimsy!
Opening the Piñata,To use this piñata, instruct the receiver to hang it (or have another hold it high) and just pull the pull cord on the bottom! In a tug, all of the fun and festive contents should shower around your receiver! Have fun!
More from our Surprise Piñata Birthday Party:
(Use this same technique to make the oversized Golden Birthday Piñata that I make for our surprise party. The memory making has continued, as Francesca has it up in her room as a decoration)
Surprise Birthday Party
Recipe for Surprise Cookies

Alphabet Muffin
DIY: Alphabet Containers
DIY: Numerical Birthday Candles
Gift Wrap #1: Confetti Wrapping Paper
Secret Agent Birthday Party (+ How to make a Labyrinth – not pictured)


