What every “spy kid” needs: Super Strength Locked Diaries!

You don’t have to have a party like ours (click here), to have one of your own!


These Diaries and handmade tasseled arrow pencils (click here), among other spy pieces, were our Secret Agent Give away. Birthday party seating was marked , in a similar color and theme, with explosives Place Cards/Napkins for all to find their places and disassemble! It was a great way to keep the expectation moving, after the labyrinth! (click here)
Hello! Are you having a great week. Our sun has been shining and shining! For me, it’s been a week of Spring cleaning week of sorts here: both around my house, work, and computer catch up. Are you feeling this way, too? I have some new and super fun party happenings that I can hardly wait to share with you, but, first realized that I hadn’t shared how to make these Super Strength Locked Diaries with you yet! I don’t never want to halt the fun! Happy Making! Continue below for the full tutorial:
TUTORIAL:Let’s get started with what you’ll need:
Paint Brush
Sturdy but standard Hole Punch
Red Gauche or Tempera Paint
Red Ribbon
Small Lock and Key (Preferably, just one size larger than the Suitcase Sized but those work, too.)

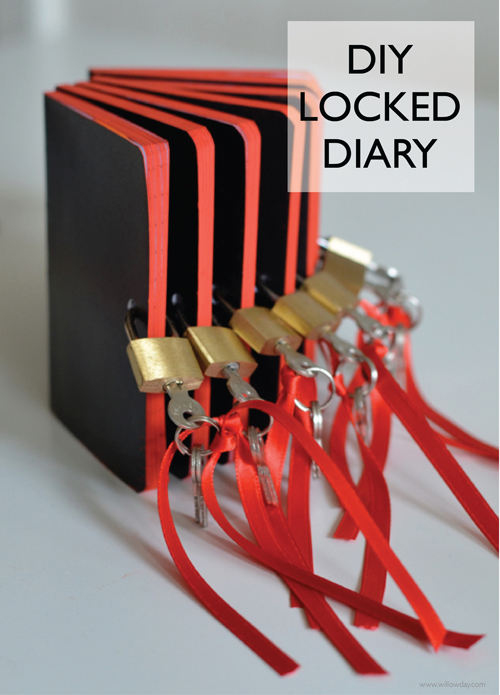
MAKE:Super Strength Locked Diaries, begin by punching the holes into the journal. I thought I would have to use a real drill and read up on lots of techniques, worried a little…; but, while I was waiting for my hubby to come home with drill assistance, I lost patience and just started punching holes myself. I was surprised how well this worked and before I knew it, I had 25 journals ready for painting. The key was to first cut a template: using a scrap piece of paper cut it to the exact size of the cover. Measure the center right (opening side) and punch once hole, while the hole punch is in place trace around the hole punch. Now use this as the template on top of every journal!
Step One: Punching the Holes1. Carefully fit this template to the top of the journal.
(Important Note: You will punch holes in about 1/4 of the book each time — so that you’ll have to repeat these steps about 4 times per book. If you use this method, the holes will be clean and won’t stick. If you use this template, they will always match up correctly.)
2. With the 1st section of pages held together tightly, slide the hole punch into the traced outline and punch
3. Remove the template and place it on top of the next section, making sure that the outside edge is perfectly aligned; punch and repeat until the book is finished.
Step Two: Paint
Using a very, very thin coat of paint paint the edge of the journal. Use a gauche or a tempera as an acrylic contains plastic and will bind the pages. To paint the edges, pinch the book together tightly and paint all exposed edges.
Step Three: Lock and Key
Tie a ribbon through the key hole. Insert the lock into the journal and close with the key attached to the lock.

Tassel Pencils
Secret Agent Birthday Party
How to make a Balloon Garland
Easy Pocket Necklaces (Great project to pair with the journals)
Silly Straws: What’s the longest drinkable straw you’ve ever made?