
ICE ART #3: VALENTINE’S ICE ART
Happy February 1st. I’m on the 14 day countdown to Valentine’s Day. Are you? It’s been such fun to share this ice series with you. I now want to share a Valentine’s Day Special, too. I would love to hear how you use this one: let’s bring Valentine’s Day outdoors! Living in Sweden, where Valentine’s celebrations are simple in comparison to those, in the US, I am influenced by the Swedish low key, natural approach to design and sensitivity to nature. These met my vision of what I wanted for this holiday.
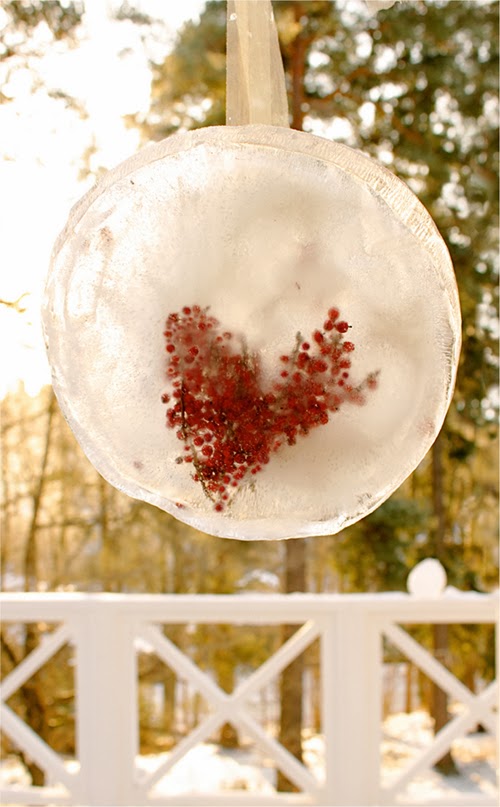
Something simple and something natural: we used things we find in our yard, at home, or for this one: re-cycling the winterberry branches we had left from the holidays.
This is something that strikes me about many Swedish crafts: the ingredients often come from nature or are built/designed with function and simplicity in mind. Maybe due to this influence, I can’t imagine anything but items provided by Mother Nature! And, doesn’t this work, well?! This Valentine’s Day Ice Art project requires a little more concentration and time in the early stages, than the first Ice Art project; but, it’s worth it. Wouldn’t these look great, greeting you by your front door? These are even pretty propped up in a snow bank, for an ice sculpture.

1) Gather Supplies: Tin pie pan, red berries such as winter berries, chiffon ribbon.
2) Set the ribbon in the pan, making sure that the ribbon goes through the entire length of the pan; fill pan with a very thin layer of ice. I found that if I set the pan and ribbon in the freezer first, then poured a small amount of water directly into the pan, which is already in the freezer, that this worked the best. 3) Once this first thin layer of ice has frozen, make a pattern out of the berries on this thin layer. Now, very, very carefully, pour a small amount of water over these berries — moving any floaters back into their heart formation. This thin layer of water will cement the berries into their pattern. It is important to keep the water as low, as possible, so that the berries don’t float away; yet, have enough water for the berries to have something to cement themselves on to. Freeze. 4) Once the patterned layer has frozen, carefully cover the pattern with water. I cover mine with about 1 1/2 inches of water. Freeze. 5) Once your art has frozen, find a suitable place to hang this beauty and enjoy! Happy Valentine’s Day Wishes!